Feishu
All you need is an App ID and App Secret to connect your Feishu bot to nexu.
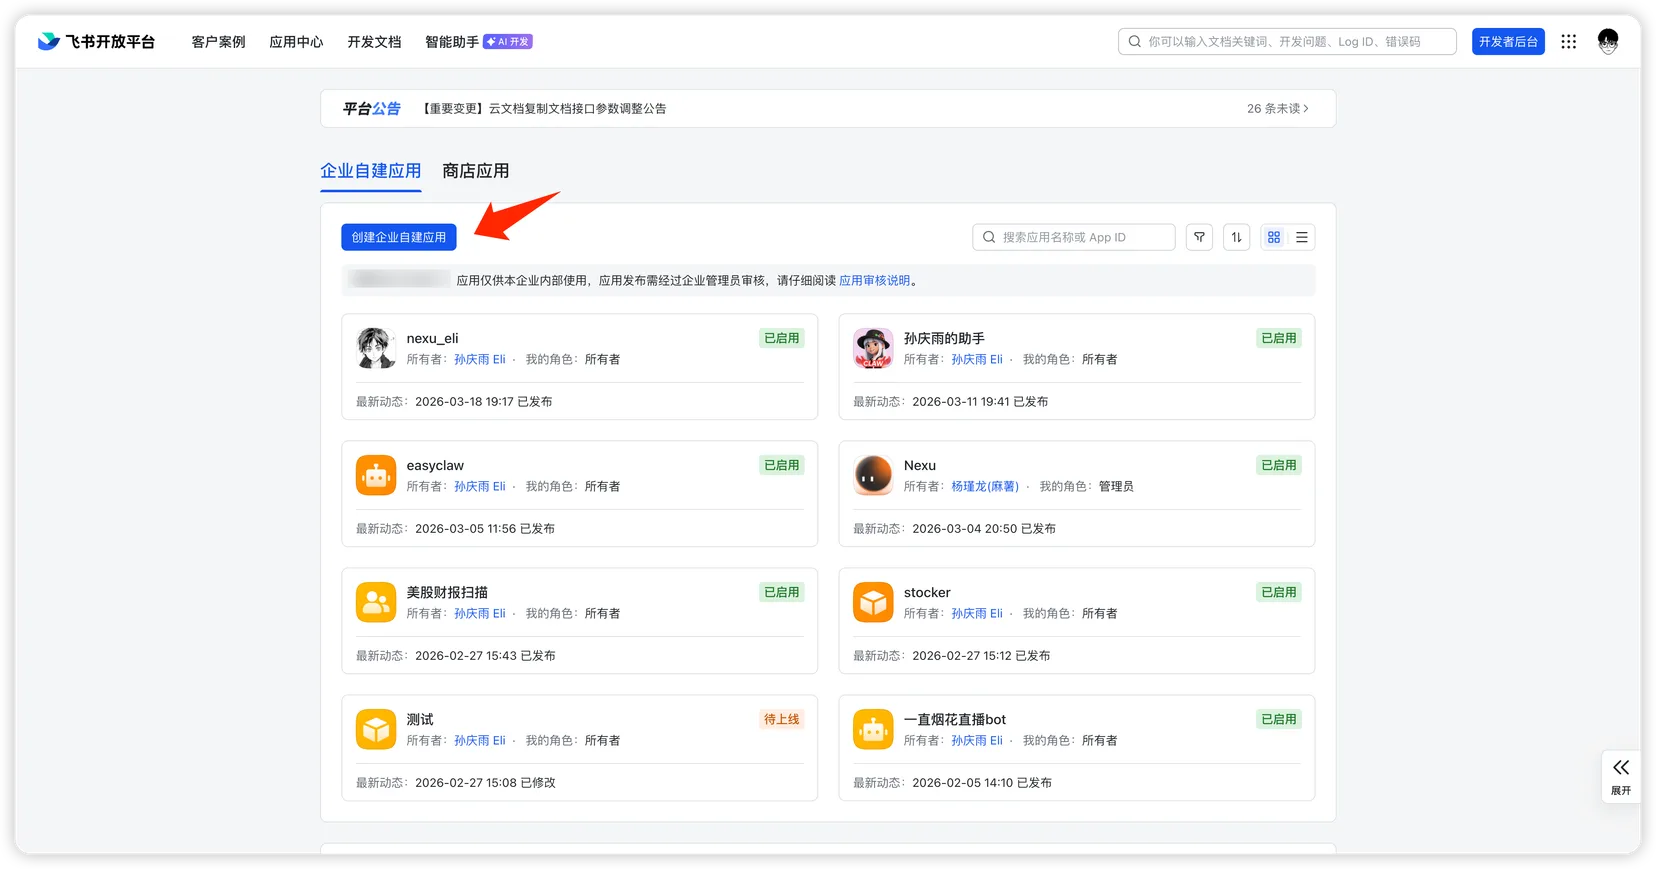
Step 1: Create a Feishu app
- Go to the Feishu Open Platform, sign in, and click "Create Custom App".
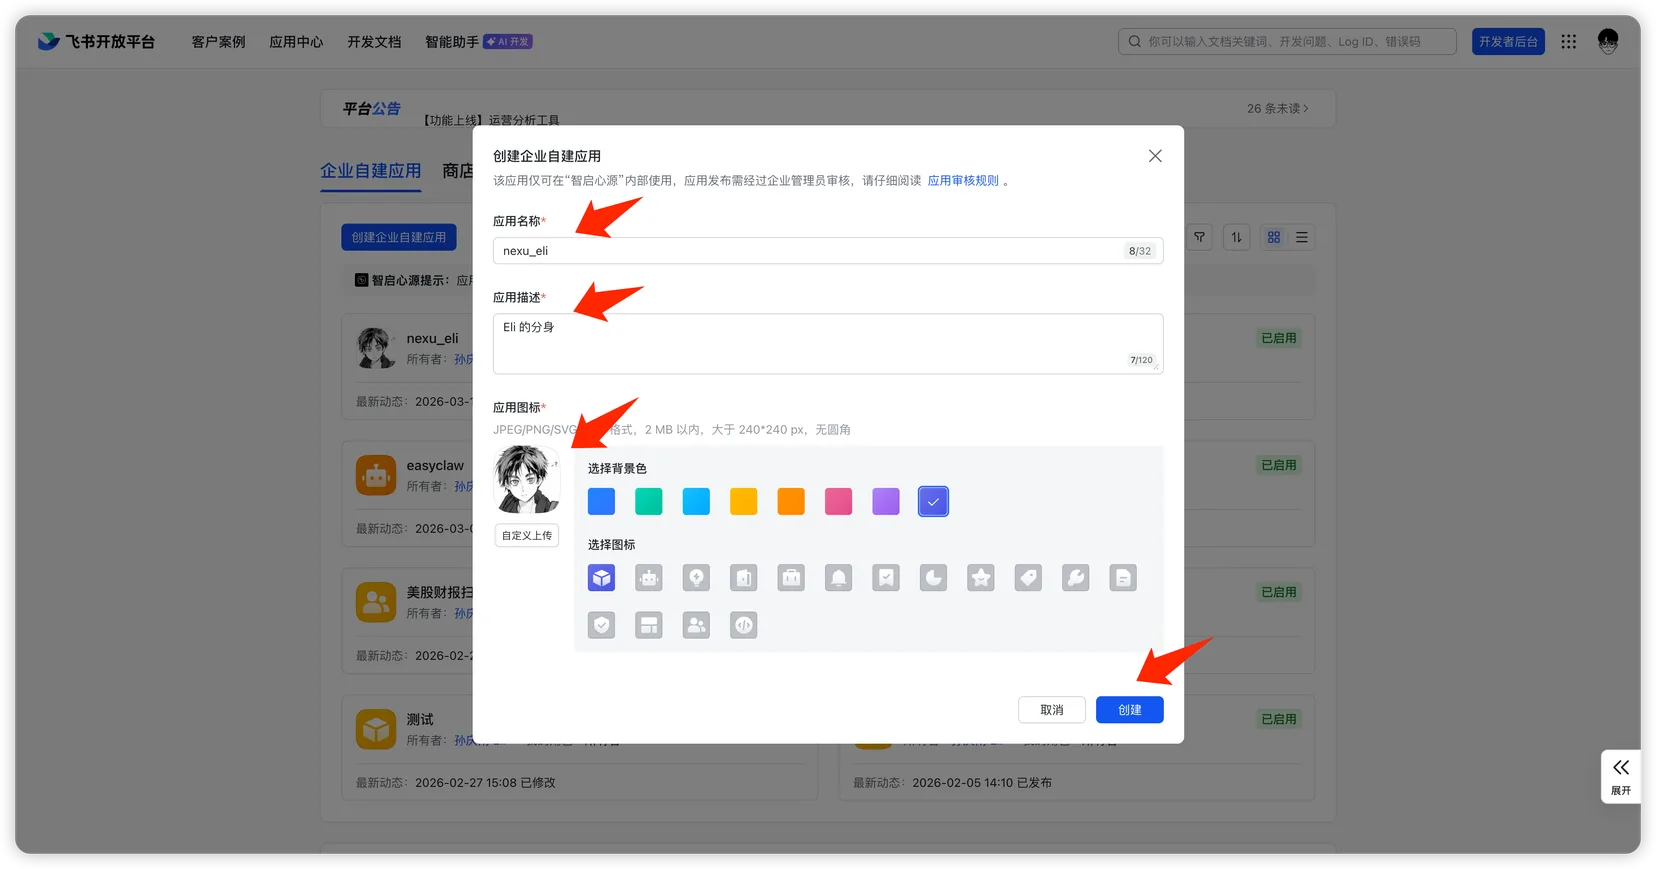
- Fill in the app name, description, choose an icon, and click "Create".
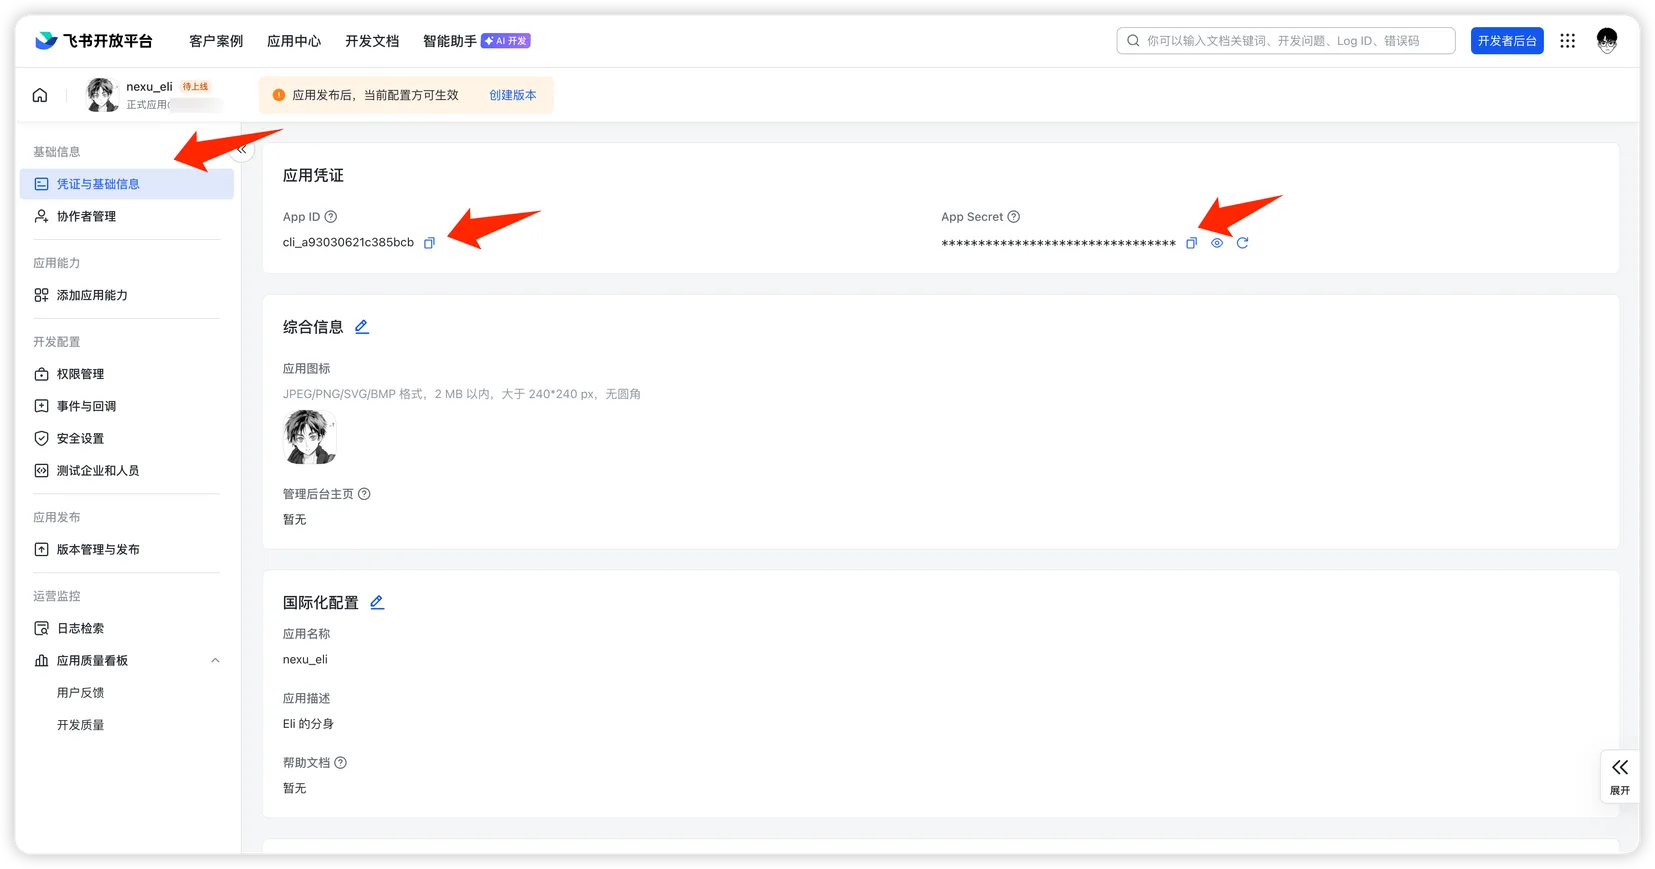
- On the "Credentials & Basic Info" page, copy these two values:
- App ID
- App Secret
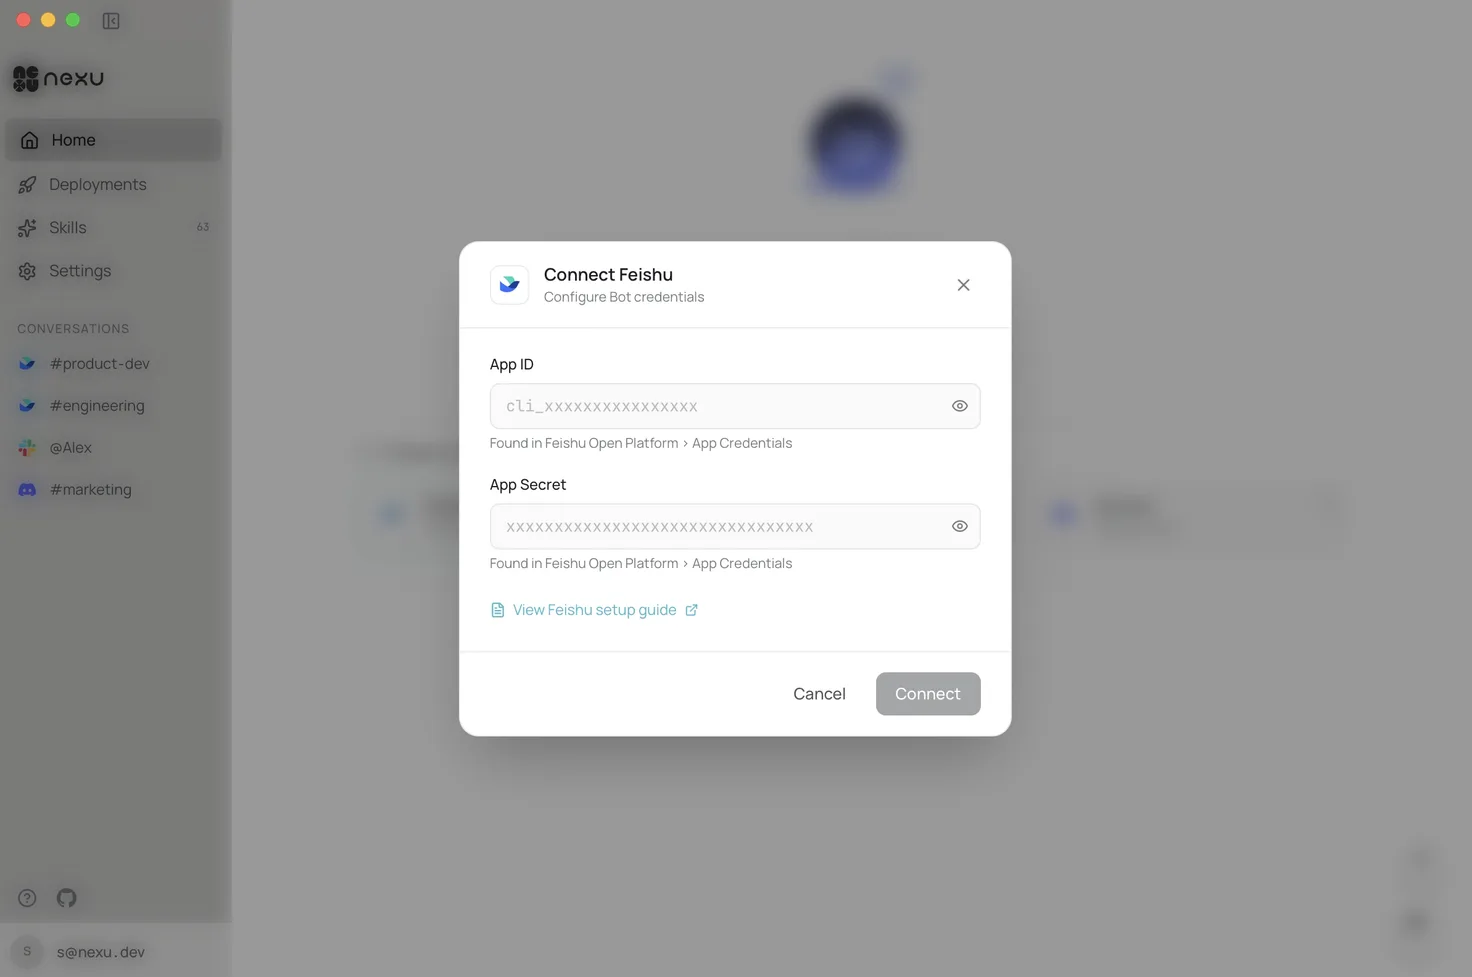
Step 2: Add credentials to nexu
Open the nexu client, enter the App ID and App Secret in the Feishu channel settings, and click "Connect".
Step 3: Import app permissions
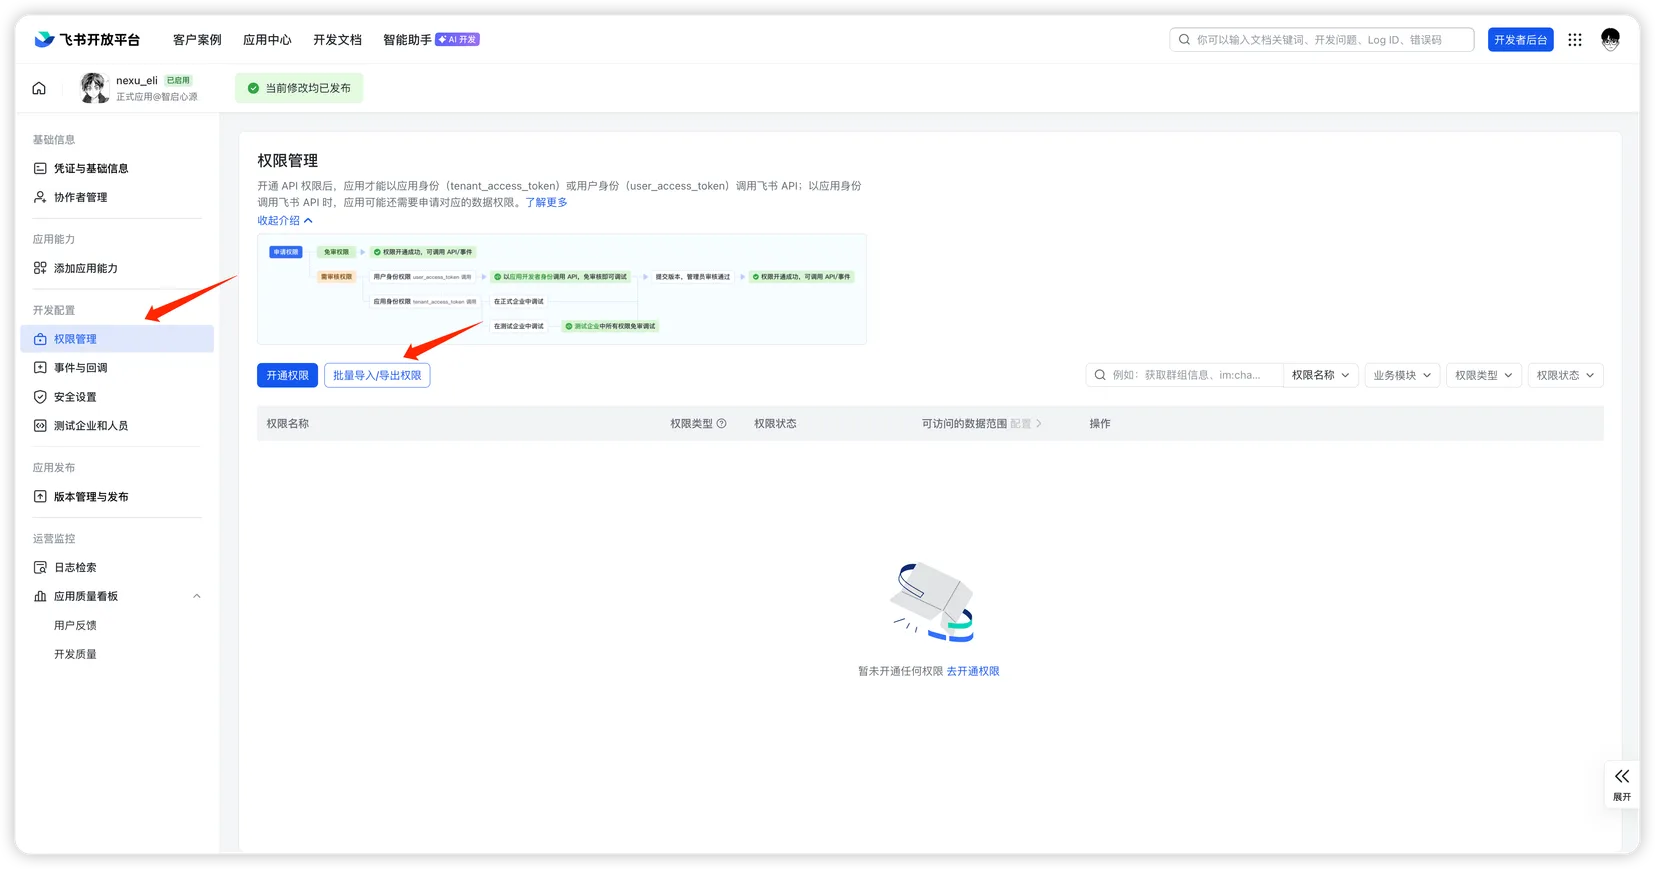
- In the Feishu Open Platform, go to your app, click "Permission Management" on the left sidebar, then click "Batch Import/Export".
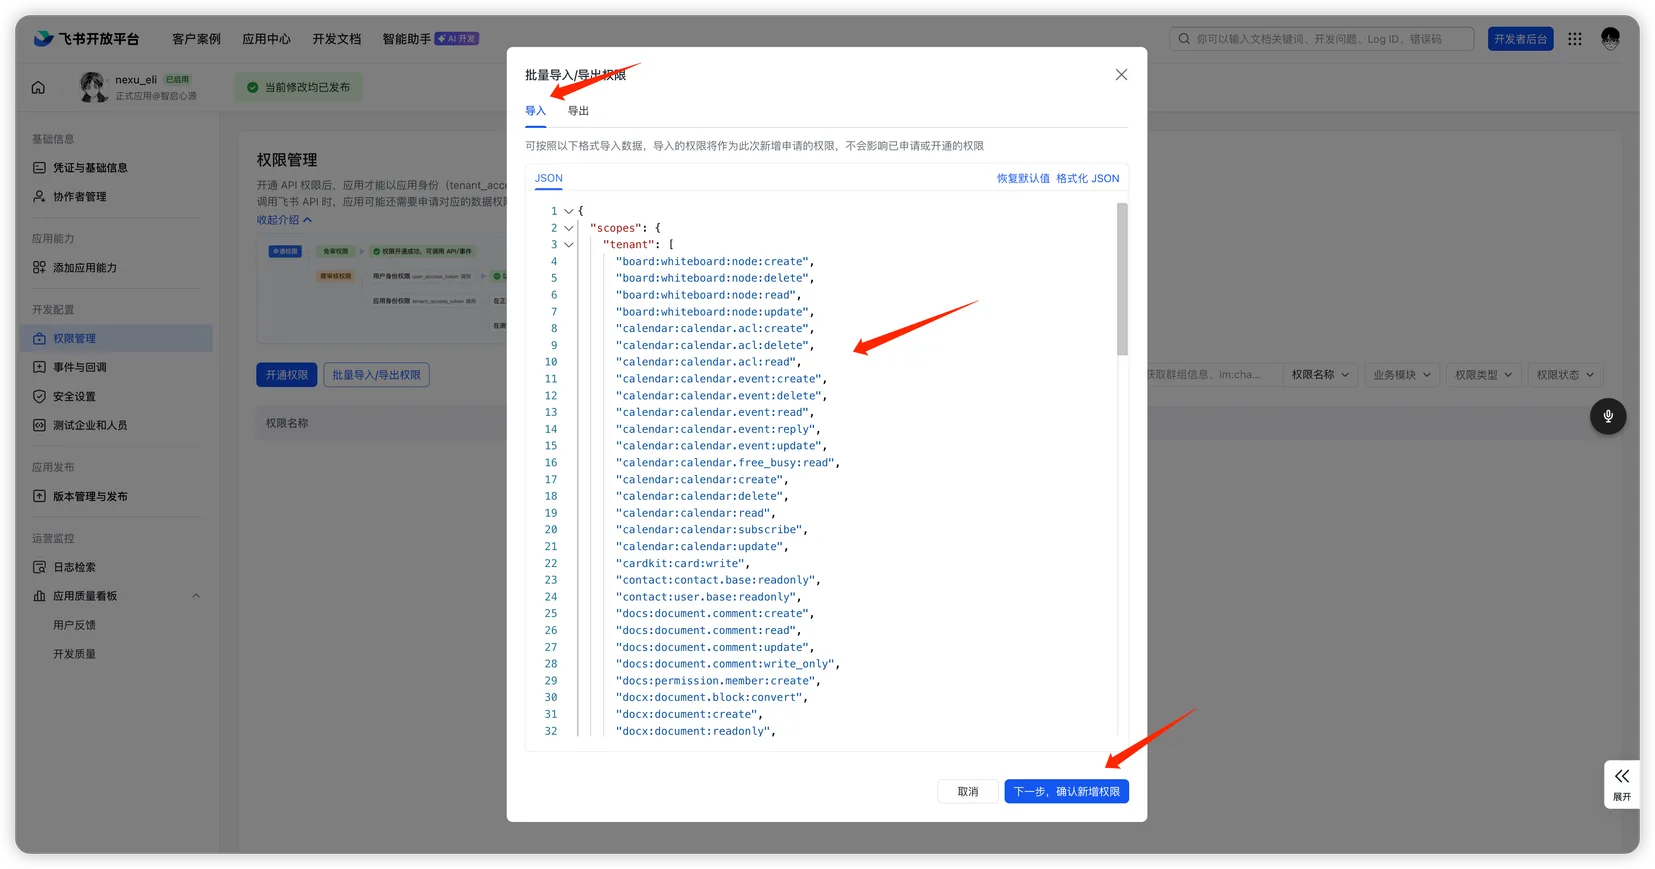
- In the dialog, select "Import", paste the following JSON, and click "Next, Confirm New Permissions".
Click to expand permissions JSON
json
{
  "scopes": {
    "tenant": [
      "board:whiteboard:node:create",
      "board:whiteboard:node:delete",
      "board:whiteboard:node:read",
      "board:whiteboard:node:update",
      "calendar:calendar.acl:create",
      "calendar:calendar.acl:delete",
      "calendar:calendar.acl:read",
      "calendar:calendar.event:create",
      "calendar:calendar.event:delete",
      "calendar:calendar.event:read",
      "calendar:calendar.event:reply",
      "calendar:calendar.event:update",
      "calendar:calendar.free_busy:read",
      "calendar:calendar:create",
      "calendar:calendar:delete",
      "calendar:calendar:read",
      "calendar:calendar:subscribe",
      "calendar:calendar:update",
      "cardkit:card:write",
      "contact:contact.base:readonly",
      "contact:user.base:readonly",
      "docs:document.comment:create",
      "docs:document.comment:read",
      "docs:document.comment:update",
      "docs:document.comment:write_only",
      "docs:permission.member:create",
      "docx:document.block:convert",
      "docx:document:create",
      "docx:document:readonly",
      "docx:document:write_only",
      "drive:drive.metadata:readonly",
      "drive:drive.search:readonly",
      "drive:drive:version",
      "drive:drive:version:readonly",
      "im:app_feed_card:write",
      "im:biz_entity_tag_relation:read",
      "im:biz_entity_tag_relation:write",
      "im:chat",
      "im:chat.access_event.bot_p2p_chat:read",
      "im:chat.announcement:read",
      "im:chat.announcement:write_only",
      "im:chat.chat_pins:read",
      "im:chat.chat_pins:write_only",
      "im:chat.collab_plugins:read",
      "im:chat.collab_plugins:write_only",
      "im:chat.managers:write_only",
      "im:chat.members:bot_access",
      "im:chat.members:read",
      "im:chat.members:write_only",
      "im:chat.menu_tree:read",
      "im:chat.menu_tree:write_only",
      "im:chat.moderation:read",
      "im:chat.tabs:read",
      "im:chat.tabs:write_only",
      "im:chat.top_notice:write_only",
      "im:chat.widgets:read",
      "im:chat.widgets:write_only",
      "im:chat:create",
      "im:chat:delete",
      "im:chat:moderation:write_only",
      "im:chat:operate_as_owner",
      "im:chat:read",
      "im:chat:readonly",
      "im:chat:update",
      "im:datasync.feed_card.time_sensitive:write",
      "im:message",
      "im:message.group_at_msg:readonly",
      "im:message.group_msg",
      "im:message.p2p_msg:readonly",
      "im:message.pins:read",
      "im:message.pins:write_only",
      "im:message.reactions:read",
      "im:message.reactions:write_only",
      "im:message.urgent",
      "im:message.urgent.status:write",
      "im:message.urgent:phone",
      "im:message.urgent:sms",
      "im:message:readonly",
      "im:message:recall",
      "im:message:send_as_bot",
      "im:message:send_multi_depts",
      "im:message:send_multi_users",
      "im:message:send_sys_msg",
      "im:message:update",
      "im:resource",
      "im:tag:read",
      "im:tag:write",
      "im:url_preview.update",
      "im:user_agent:read",
      "sheets:spreadsheet.meta:read",
      "sheets:spreadsheet.meta:write_only",
      "sheets:spreadsheet:create",
      "sheets:spreadsheet:read",
      "sheets:spreadsheet:write_only",
      "task:task:read",
      "task:task:write",
      "task:tasklist:read",
      "task:tasklist:write",
      "wiki:member:create",
      "wiki:member:retrieve",
      "wiki:member:update",
      "wiki:wiki:readonly"
    ],
    "user": [
      "contact:contact.base:readonly"
    ]
  }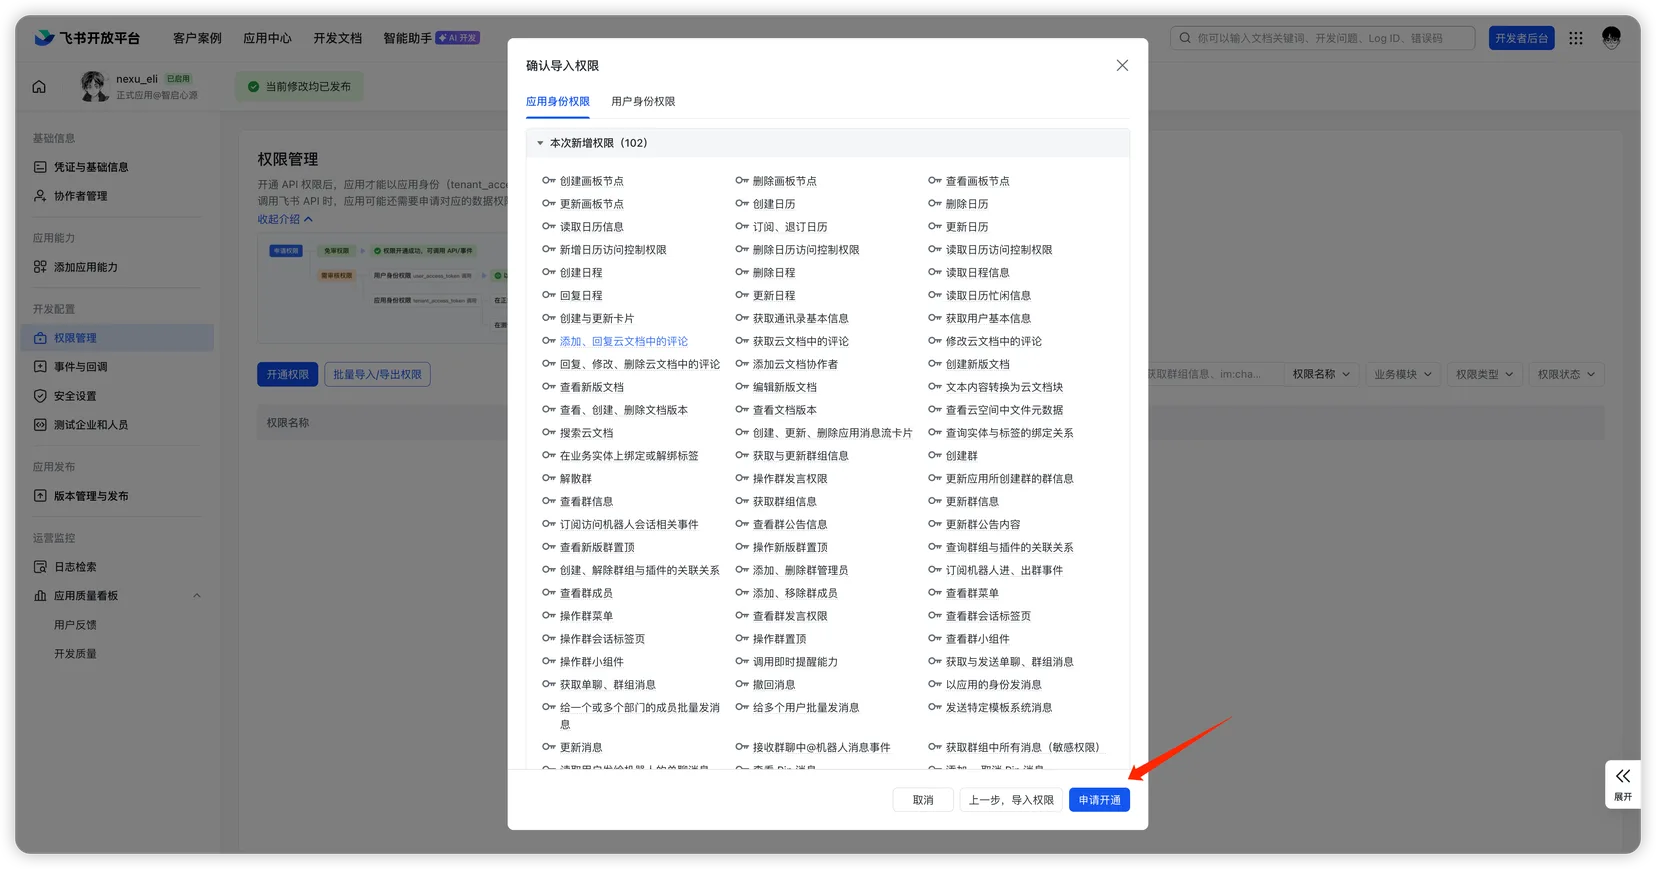
}- Review the imported permissions (102 in total) and click "Apply".
- In the data scope confirmation dialog, click "Confirm" to complete the import.
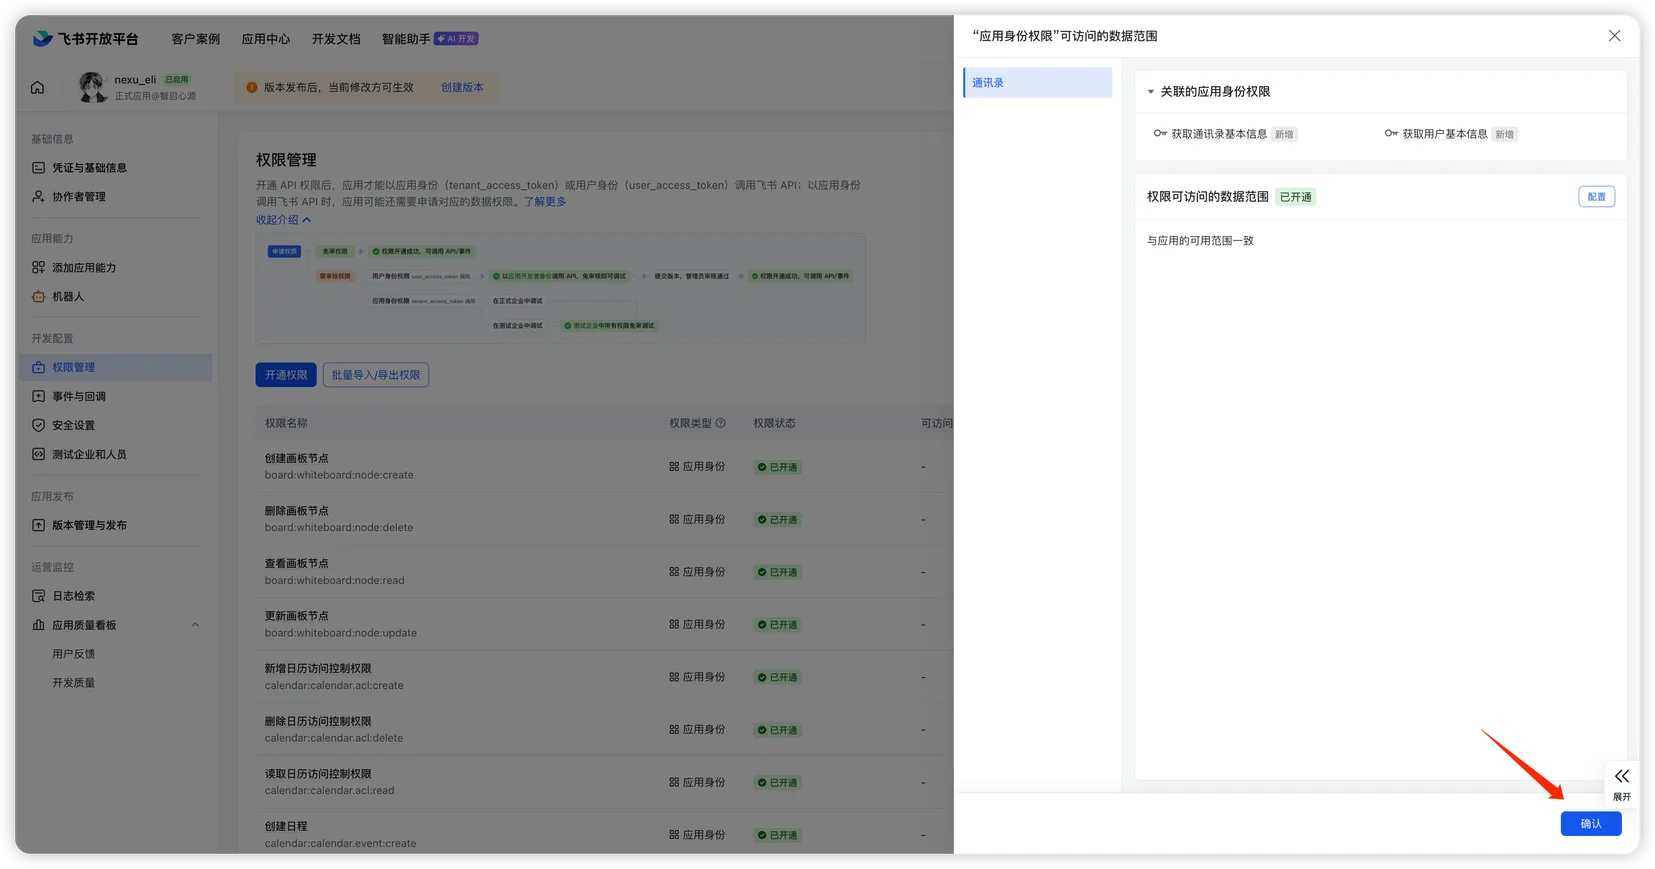
These permissions cover messaging, document read/write, calendar management, spreadsheet operations, and more — ensuring all nexu Agent Skills work properly.
Step 4: Configure events and callbacks
Event configuration
- In the Feishu Open Platform, go to your app, click "Events & Callbacks" on the left sidebar, and open the "Event Configuration" tab.
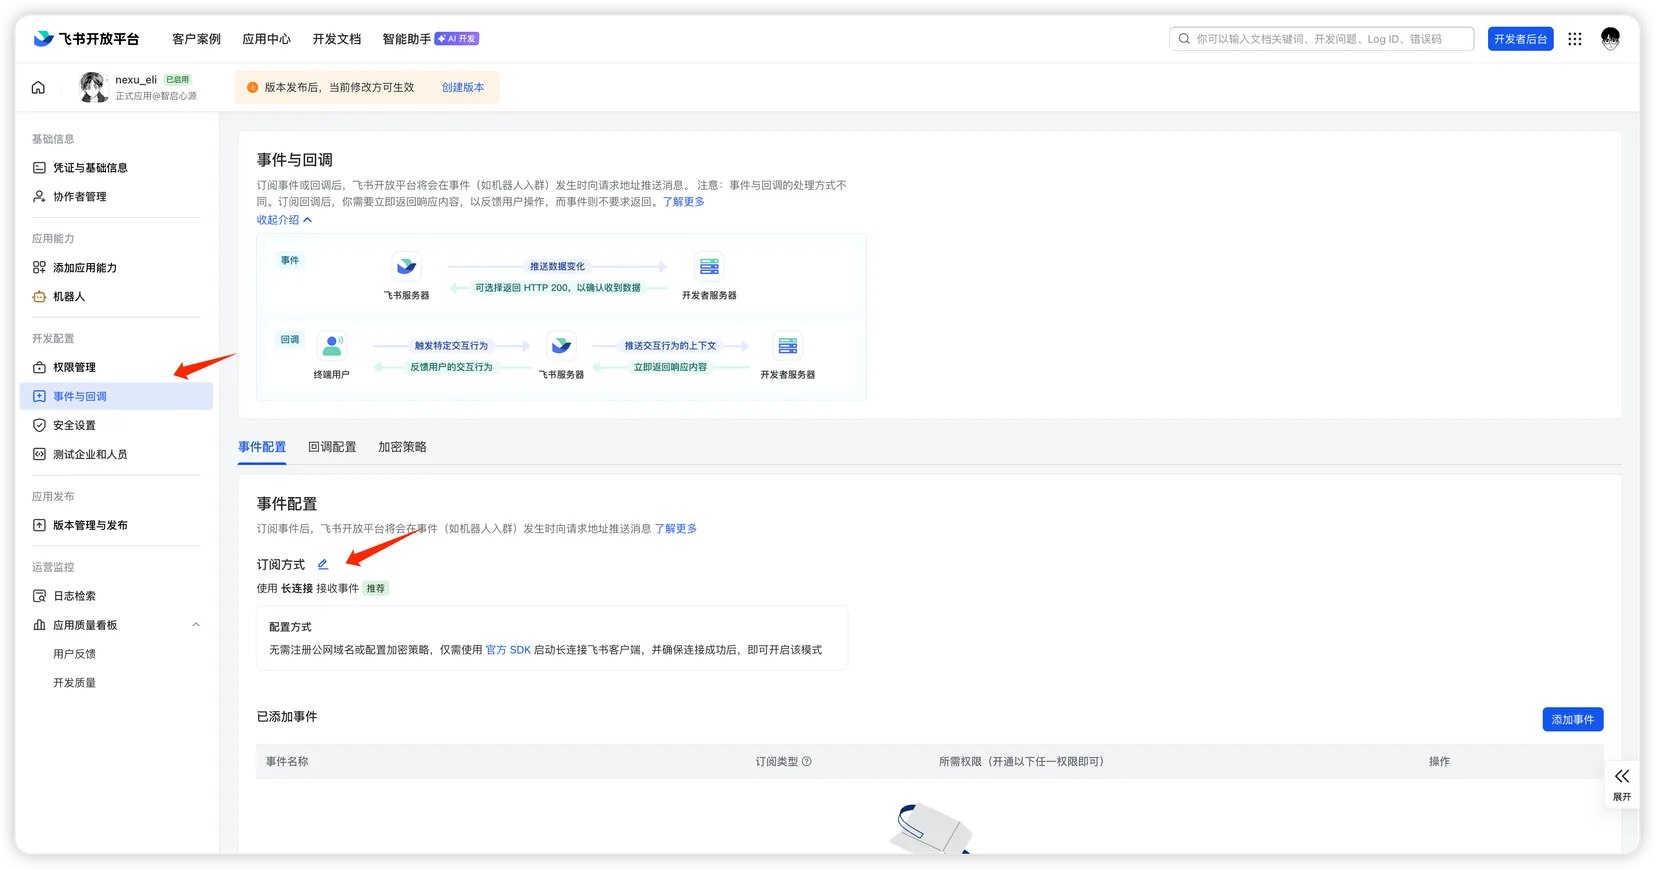
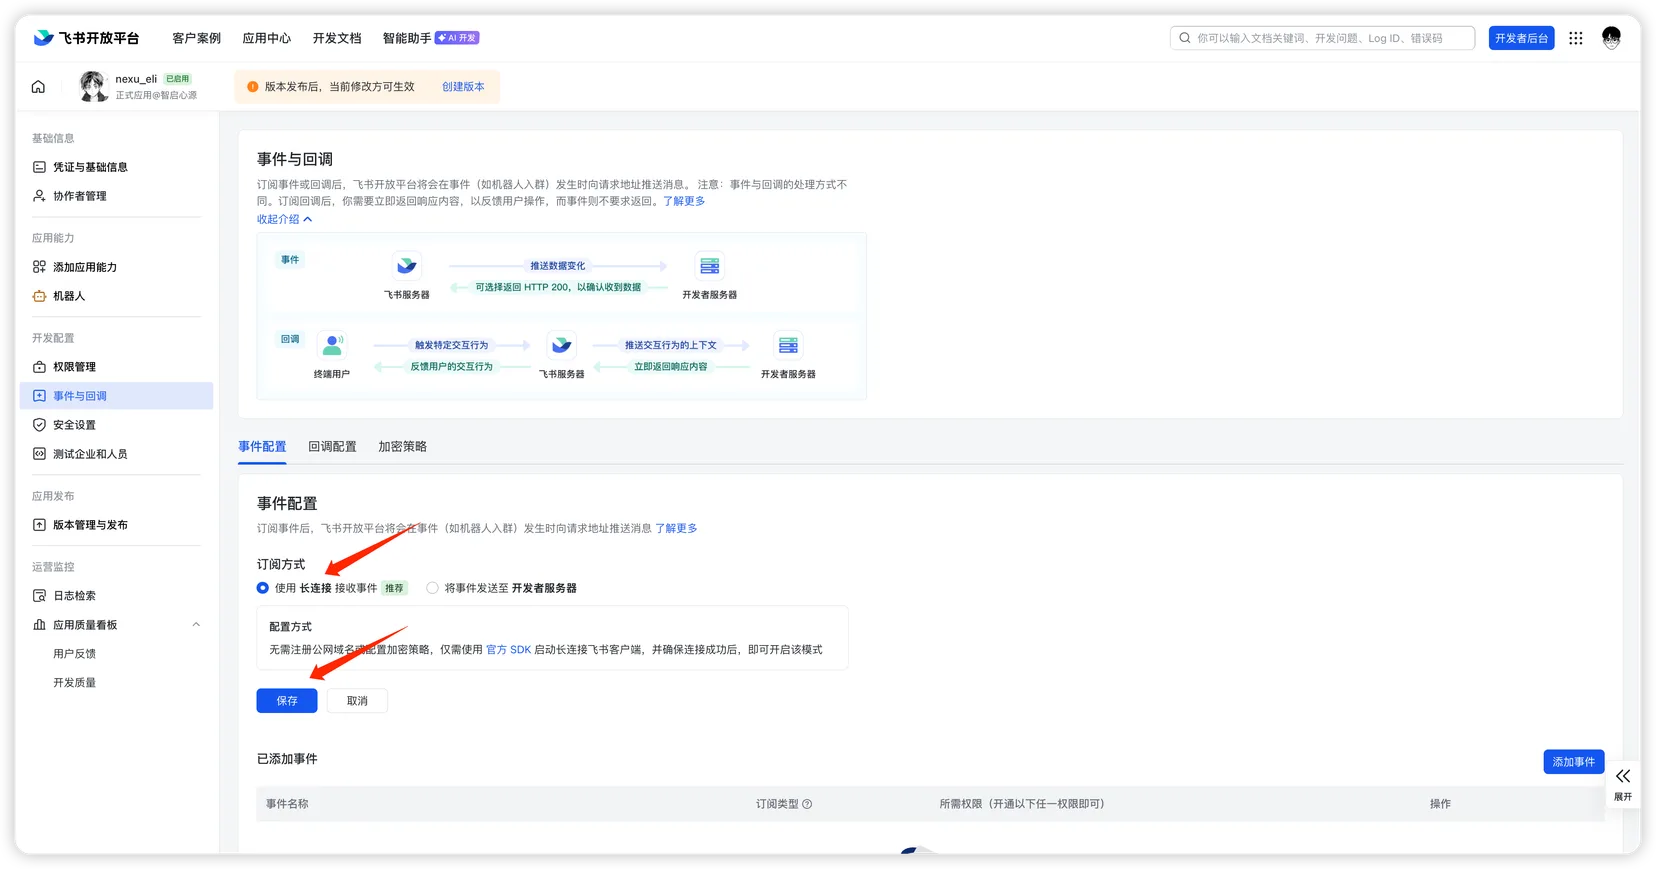
- Click the edit button next to "Subscription Method", select "Use Long Connection to Receive Events", and click "Save".
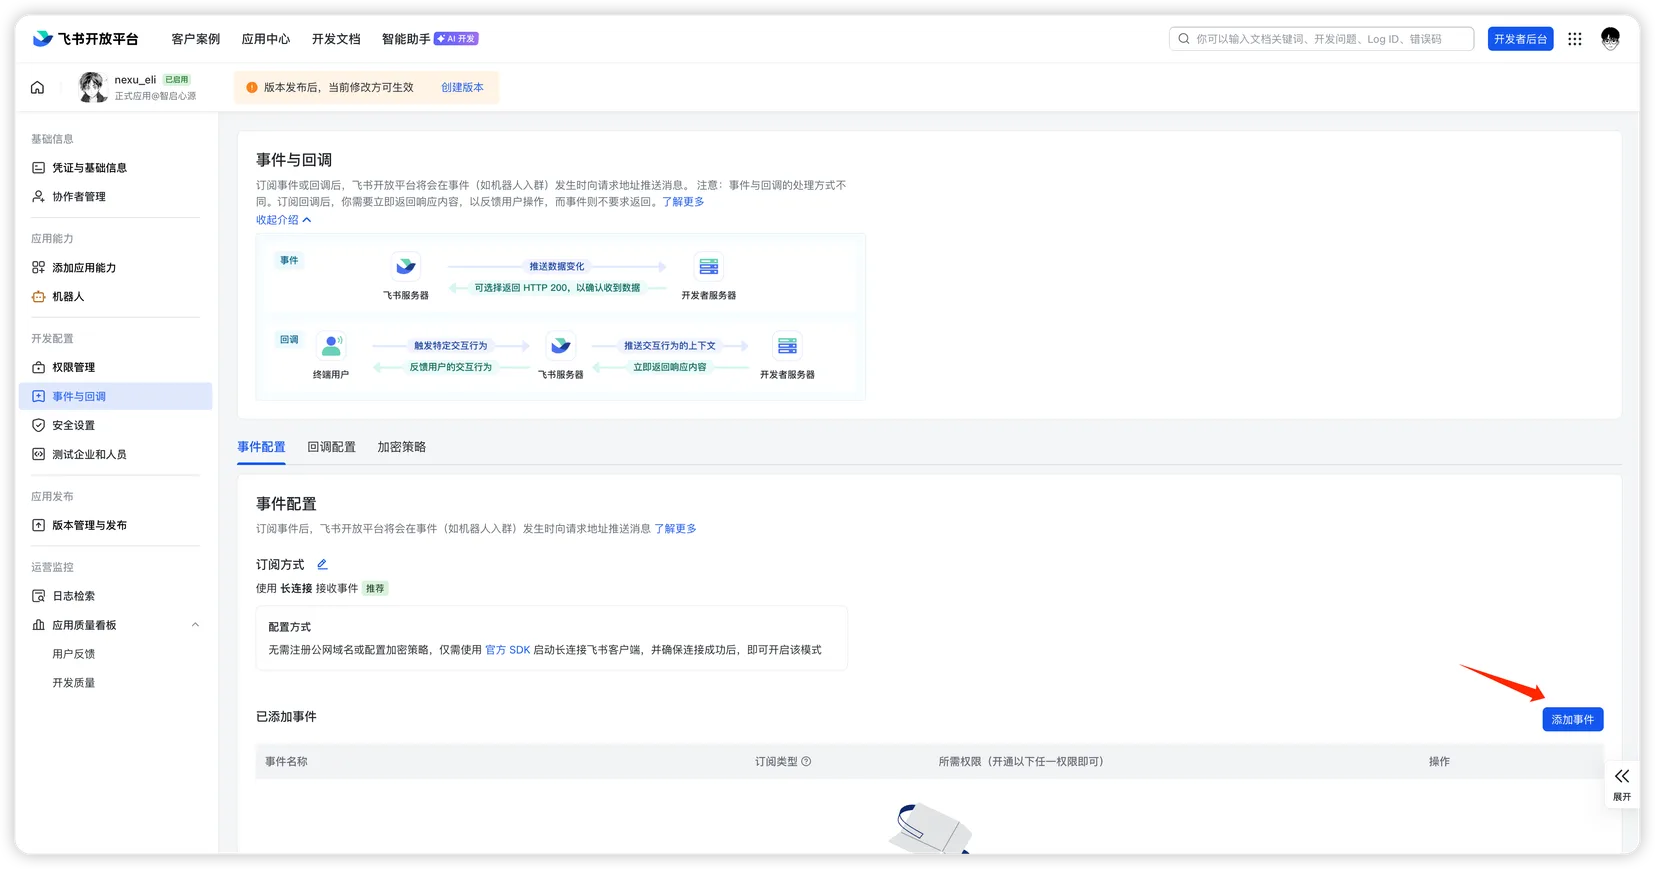
- Click "Add Event".
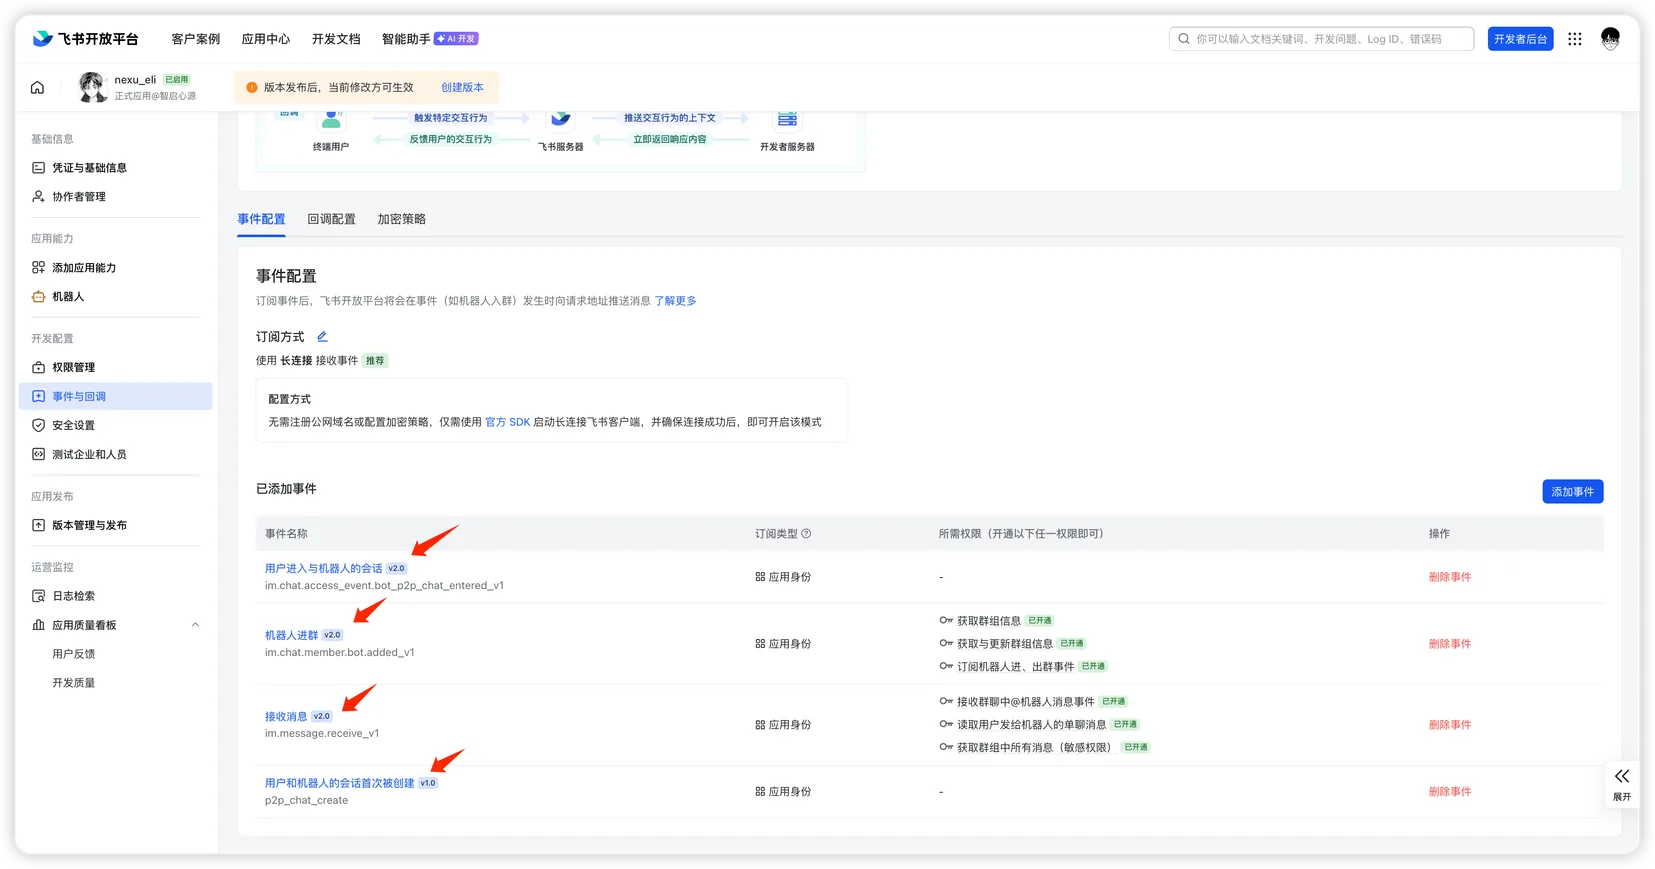
- In the dialog, search and select the following events, then click "Add":
- First conversation created between user and bot (
p2p_chat_create) - Receive message (
im.message.receive_v1) - Bot added to group (
im.chat.member.bot.added_v1) - User enters bot conversation (
im.chat.access_event.bot_p2p_chat_entered_v1)
- First conversation created between user and bot (

- After adding, confirm the events in the "Added Events" list.
Callback configuration
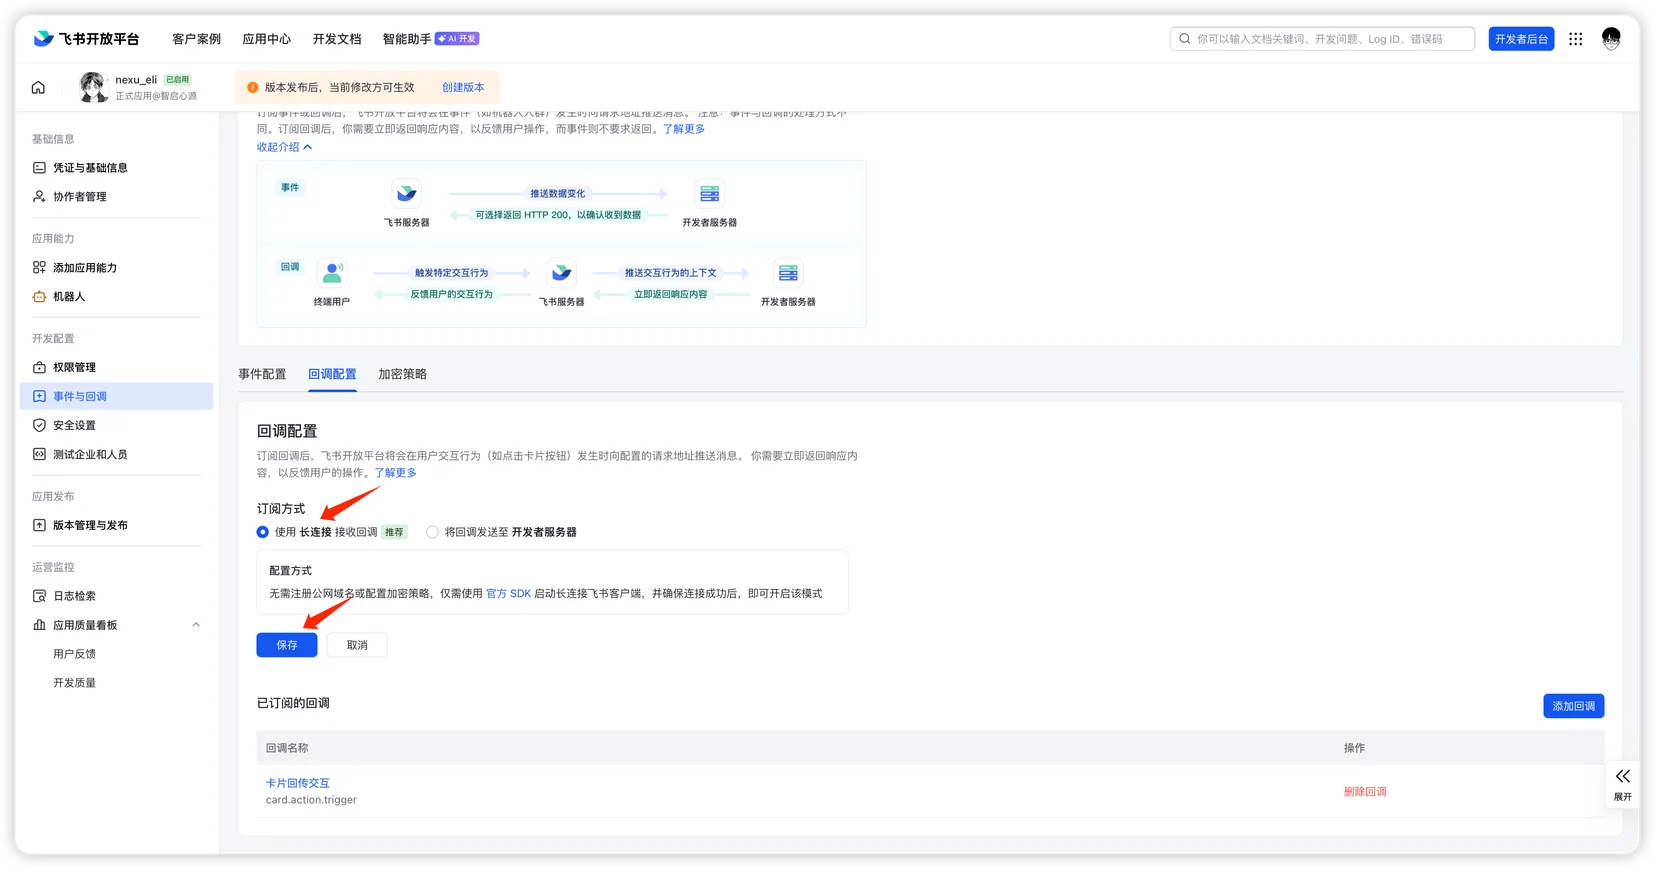
- Switch to the "Callback Configuration" tab and click the edit button next to "Subscription Method".
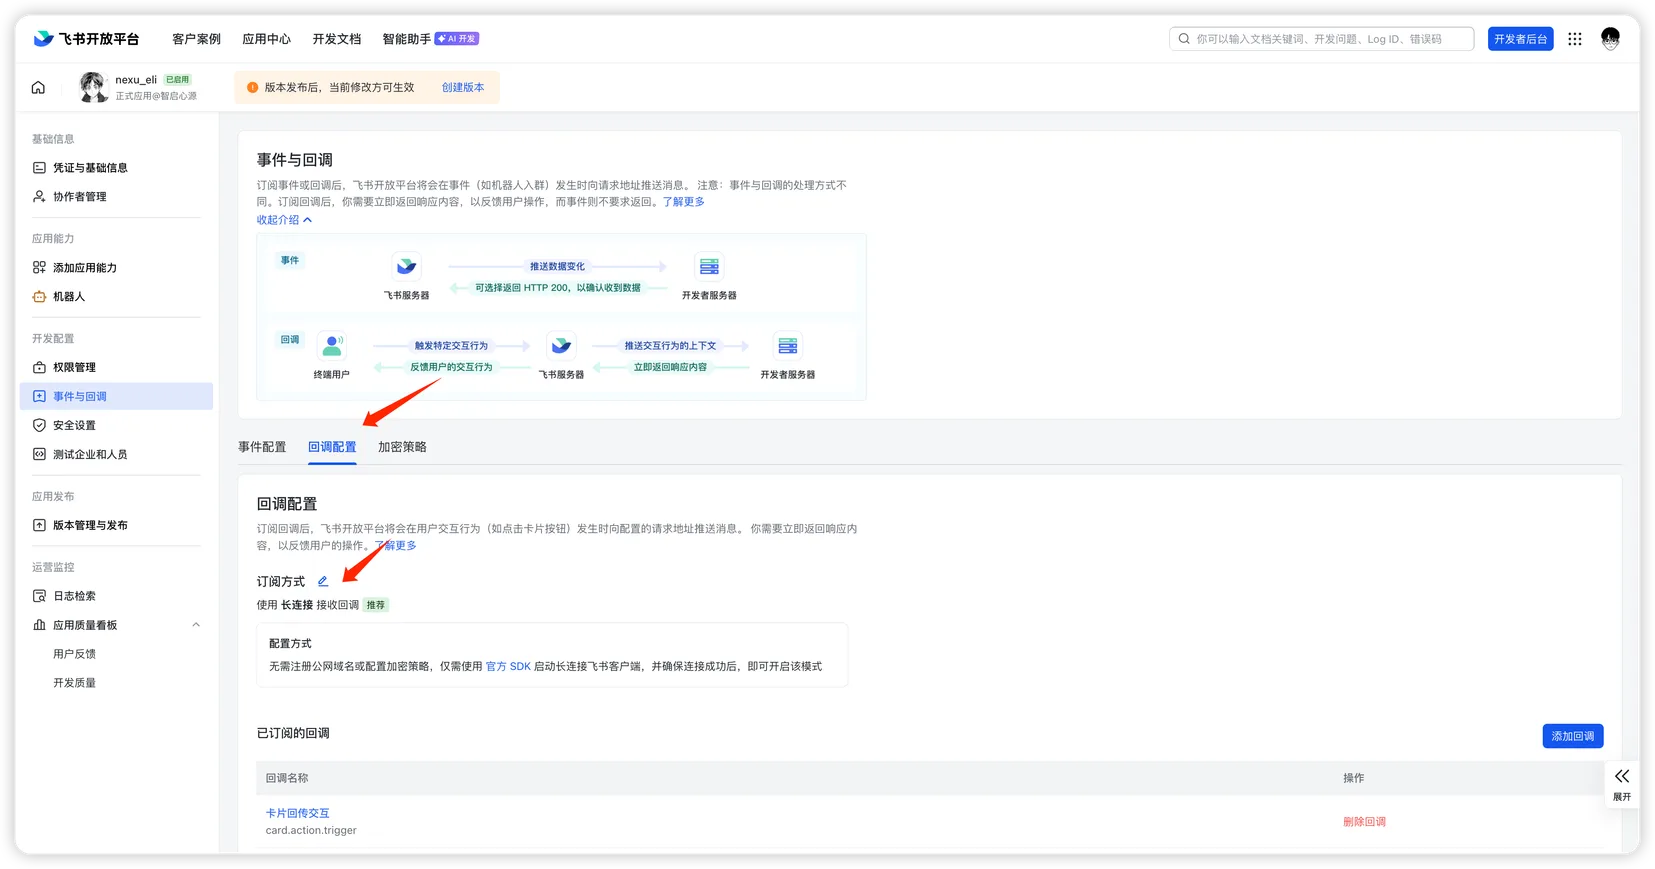
- Select "Use Long Connection to Receive Callbacks" and click "Save".
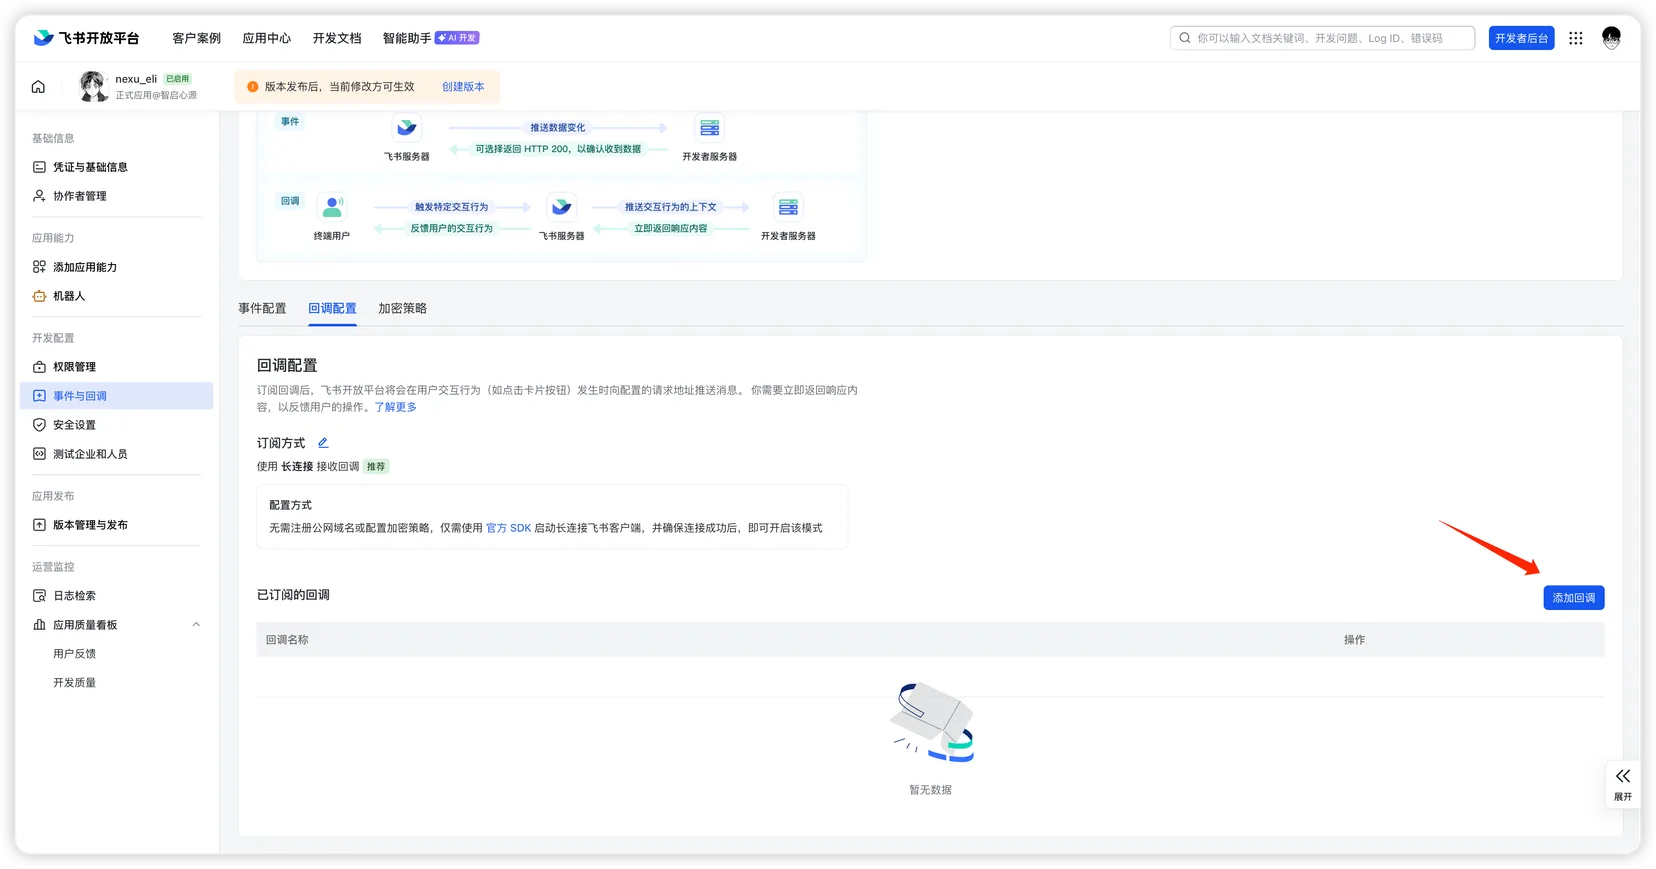
- Click "Add Callback".
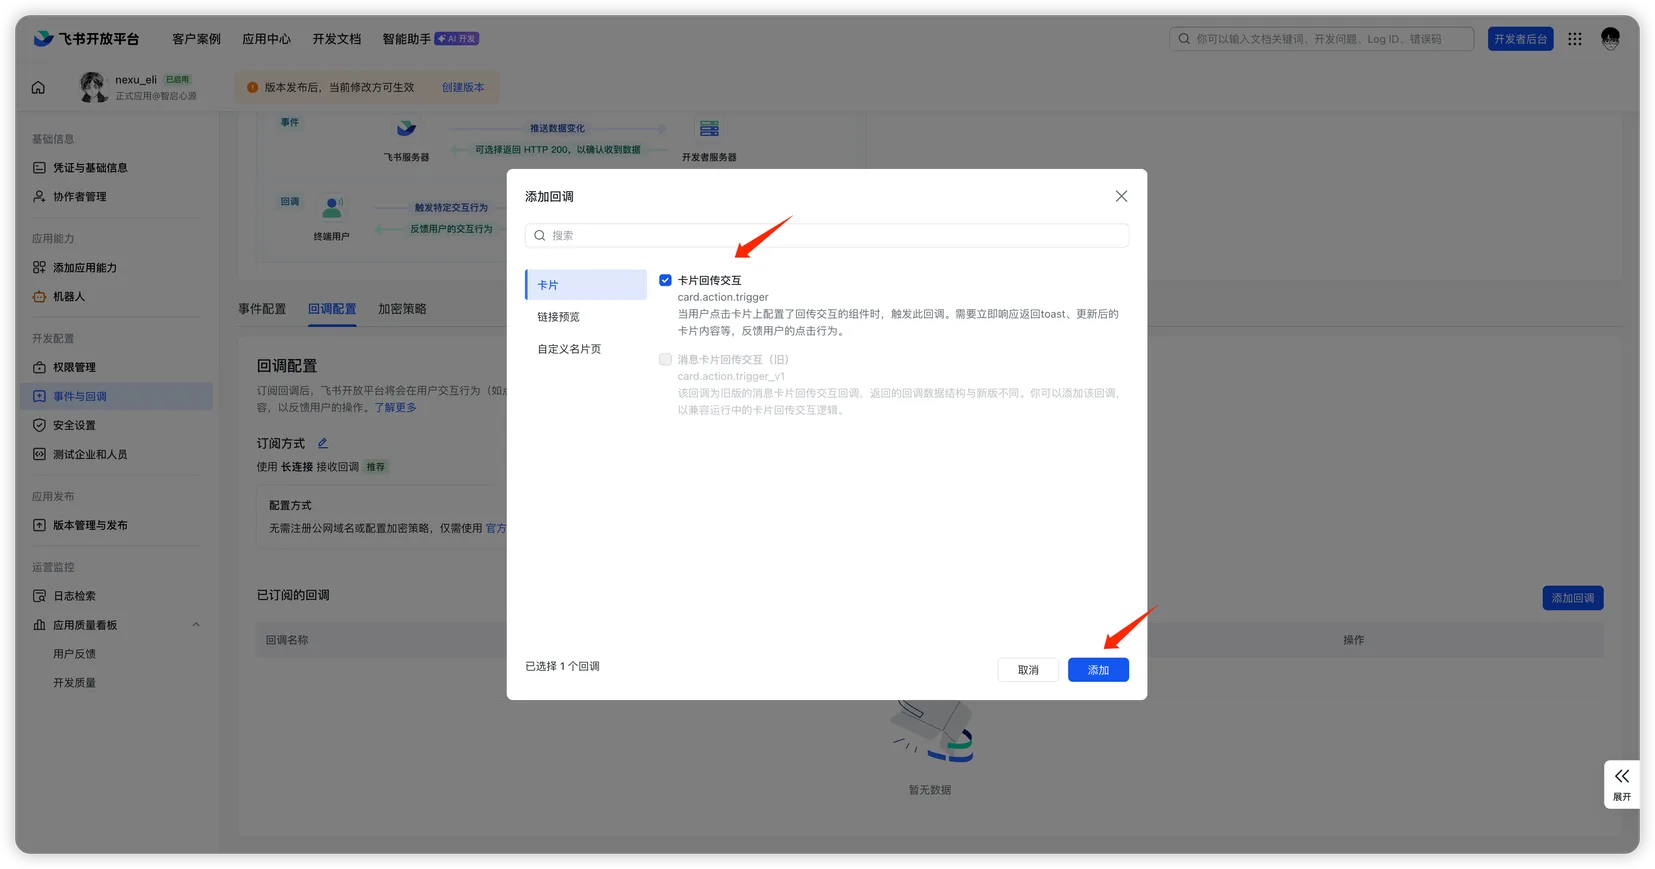
- In the dialog, select the "Card" category, check "Card Action Trigger" (
card.action.trigger), and click "Add".
Step 5: Publish and test
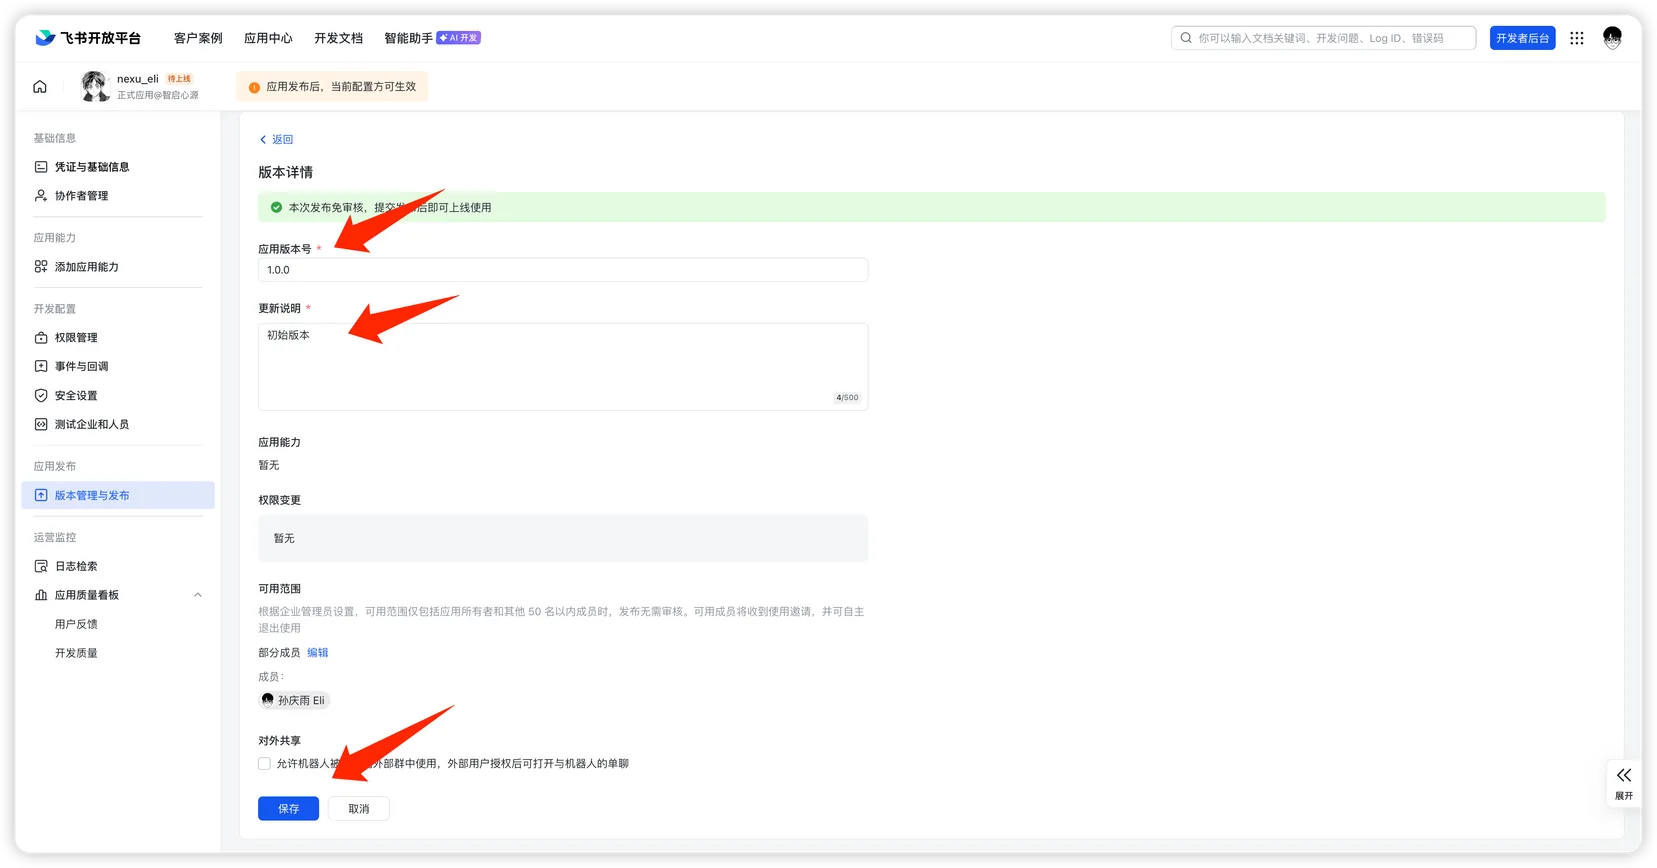
- Go back to the Feishu Open Platform, navigate to "Version Management & Release".

- Click "Create Version", fill in the version number and release notes, then click "Save".
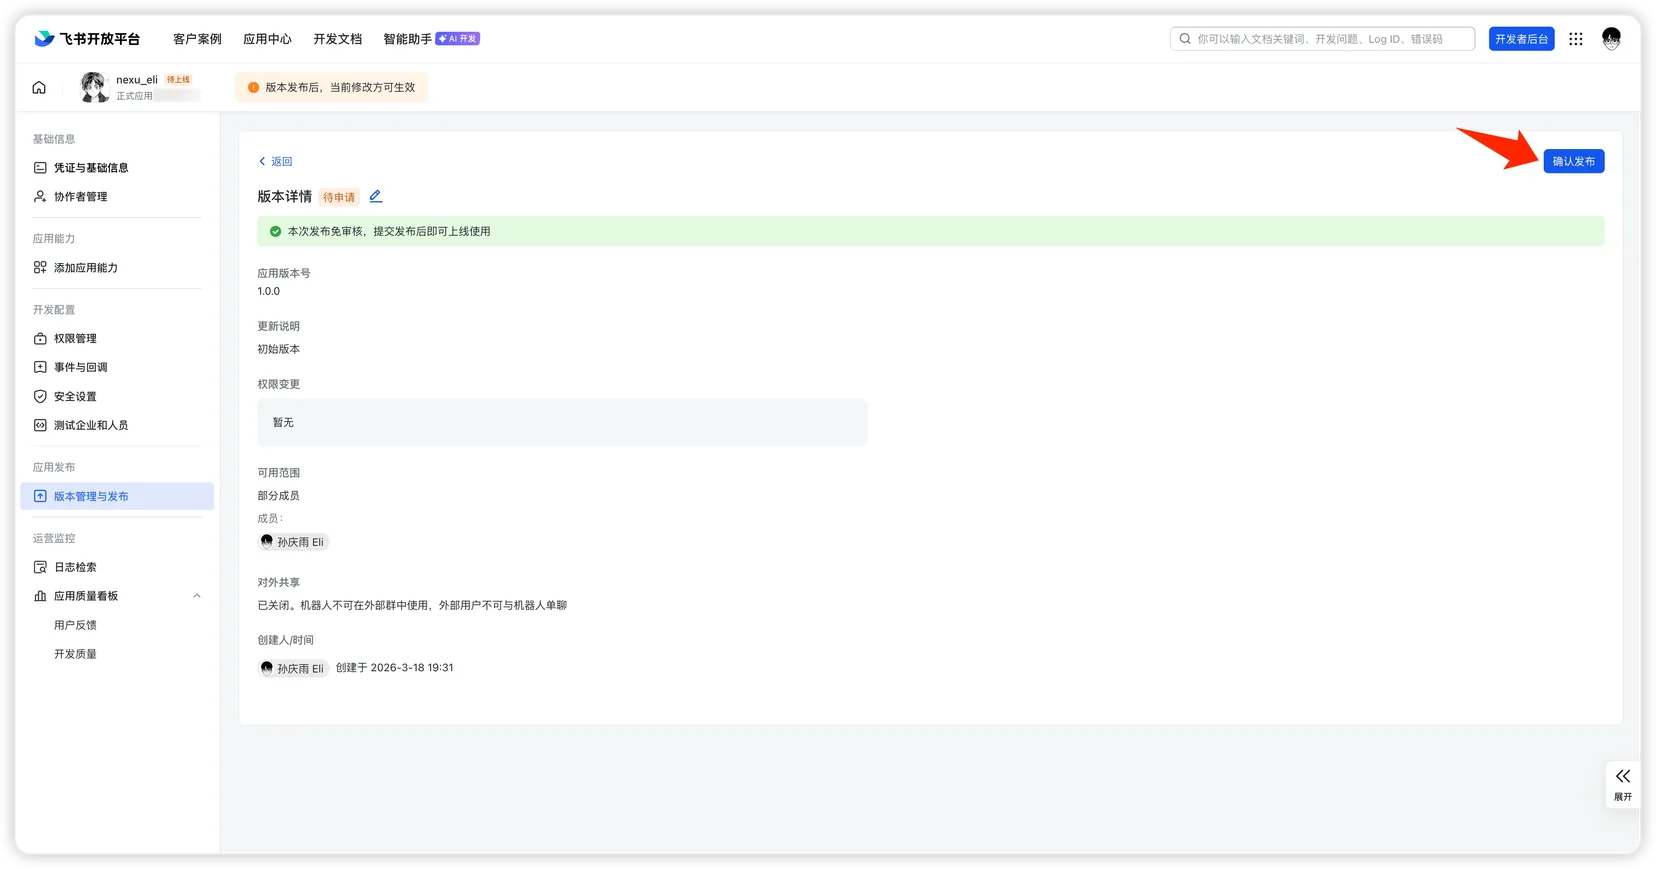
- Click "Publish" and wait for approval.
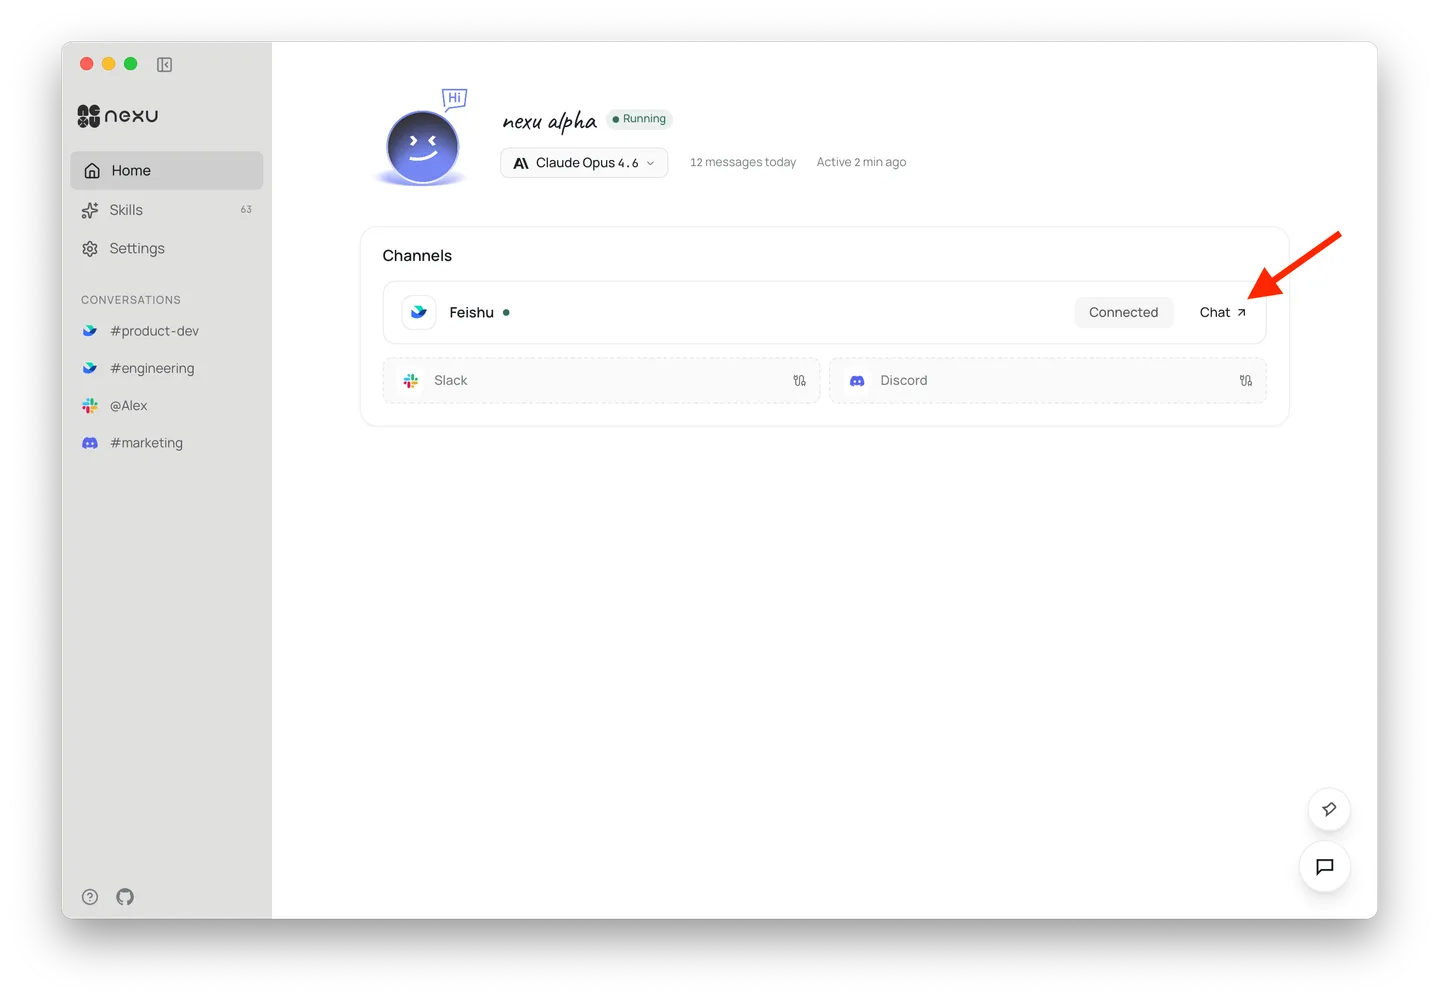
- Once approved, click "Chat" in the nexu client to jump to Feishu and chat with your bot 🎉
FAQ
Q: Do I need a public server?
No. nexu uses Feishu's long-connection (WebSocket) mode — no public IP or callback URL required.
Q: Why are so many permissions needed?
These permissions correspond to various nexu Agent Skills (messaging, docs, calendar, spreadsheets, etc.). If you only need basic chat, you can enable just the im: scopes.